
Radio Shack HTX-100 to
DownEast Microwave® 28 MHz IF
Transverter interface
Synopsis
This is an easy modification - it should take about an hour. The HTX-100 makes a nice IF for the DEMI transverters, and they are not expensive on the used market. To do this modification, the transverter must be configured in the "PTT to ground" mode. This project picks up voltage from the HTX-100 and uses it to trigger an inexpensive Radio Shack® reed relay. This modification is easily reversible, other than the installation of the phone jack which can be removed and replaced with a small bolt.
Required Parts
- 1/8" mini plug
- 1/8" mini jack, 2 conductor, open circuit
- ½ watt 100 Ohm resistor
- Radio Shack 1 amp SPST reed relay, catalog #275-232
- Small project board
- 1 foot Hookup wire
- Two conductor cable
- RCA plug
Required Tools
- Phillips head screw driver
- Electric drill motor
- Drill bit to fit phone jack
- Soldering pencil and solder
- Wattmeter and dummy load
- VOM
Instructions:
- Remove the top from the HTX-100.
-
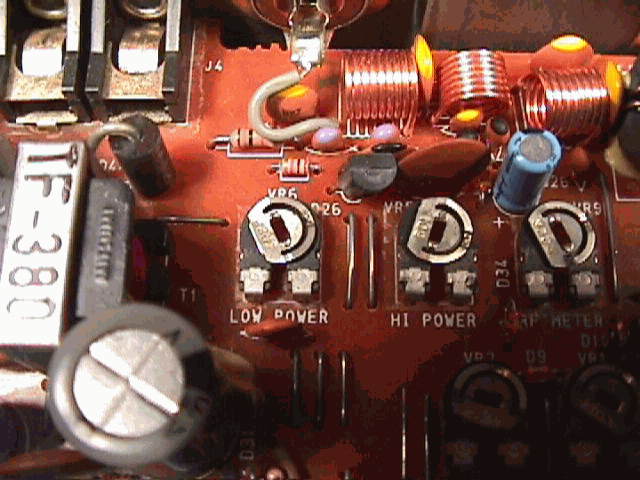
Locate the "Low Power" and "Hi Power" pots on the top circuit board.
They are toward the rear on the left side just ahead of the co-ax connector
and are clearly marked. Adjust the high-power pot to no more than
ten watts. Adjust the low-power as high as it will go.
Note: To use these settings you need to have your transverter configured for the 1-10 watt IF drive level!) Setting the high power pot in this manner will make it impossible to over-drive the transverter.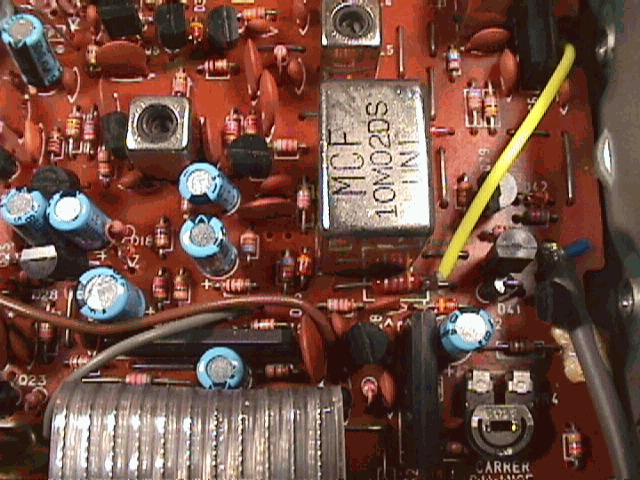
-
Use the VOM to locate a point that puts out 7.75 volts when
the microphone is keyed - there are several. I used an un-marked resistor
just ahead of IC1. It is located in the right front of the top of
the board. Tie the hookup wire into the right leg of the resistor.
Leave yourself plenty of slack.
- Remove the bottom cover. Mark and un-solder the speaker leads.
-
The reed relay requires 5 volts, and the maximum voltage is
7.5, so you need to drop the voltage a bit. I used a 1/2 watt 100
ohm resistor which worked nicely - I ended up with 5.54 volts. Install
the dropping resistor and reed relay on the project board as shown.
Pick up ground from the pad shown. Install hookup wires on the relay.
Fit the project board to the bulkhead as shown and trim your leads.
Use a glue gun to hot glue the board into place. Be generous with
the hot glue!
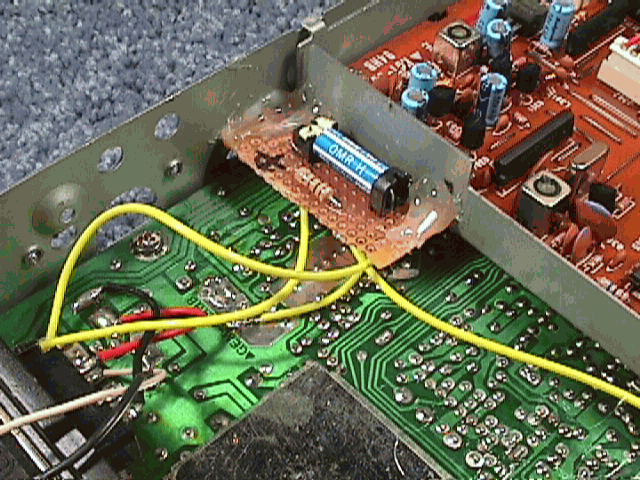
- Looking at the relay from the bottom side with the three
connections up and the 4th on the bottom, like so:
(1) (2) (3) (4) - Hook #1 to the ground on the board. #2 goes to the center connector on the jack, #3 gets power (through the resistor), and #4 goes to the ground lug on the jack. It is NOT a stereo jack.
-
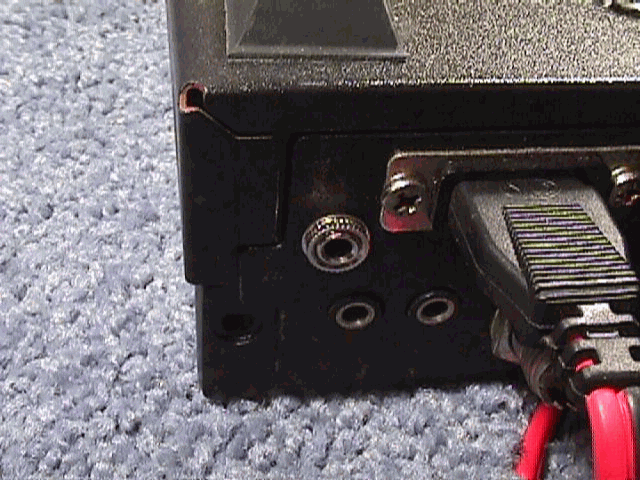
Center-punch and drill a hole for the mini jack in
the back of the chassis. There is ample room for it next to
the power cord.
- Power up the HTX-100 and check the circuit. The mini jack should go to ground when you key the microphone. If not, check your connections.
- Reassemble the HTX-100. Don't forget to hook up the speaker! Build a connector cable with the mini plug on one end and the RCA plug on the other. Double check that the RCA jack goes to ground when you key the microphone.
- Connect the transverter to the HTX-100, connect the PTT circuit, hook up the antenna, power it up and you are ready to go!
Lynn, N7CFO
Updated 22 December 2002